A Gray
Home

 Send me feedback about this section
Here's the short difference:
Gaussian splatting is a graphics method developed in the 1990s as an alternative to tesselated (triangular) rendering. Although tesselated rendering has been the norm for decades, splatting returned around 2022 or 2023 due to research papers, based on neural network techniques (possibly specifically NeRF - neural radiance fields), which suddenly turned splatting into the fastest way to render realistic scenes, because it embeds all lighting information into each gaussian using 'spherical harmonics' or something.
See this filmmaker's behind-the-scenes of how gaussian splats are starting to be used instead of photogrammetry in the film industry.
I used to be very skeptical of photogrammetry - it struggled with hair and glass, and always required enormous manual effort to clean up the files to be usable in a 3D render (i.e. to add light maps). The professional tools were probably much better at this - I imagine the film industry has ways to scan objects and automatically produce those light maps - but it couldn't be done with a 'prosumer' DSLR camera.
Gaussian splatting completely solves the hair, glass, lighting and size problems for static scenes.


Send me feedback about this section
Like neural networks (AI), these are trained using thousands of iterations, using the same mathematical technique (evolving the scene gradually through gradient descent).
These are all using significantly downscaled photos. The UL's photos are the largest - at 1/16th the size of the original photos - but all other models were created using very small images (1/68th the size of the original photos).
This is to reduce processing time - using the full-resolution images would take days for each one! But the results will be much higher quality (you can see how great the UL model is) so I plan on re-doing some of these displayed models with larger (less-downscaled) images.
Send me feedback about this section
From a fresh Ubuntu install, there's almost a gigabyte of dependencies to compile OpenSplat:
    sudo apt install --no-install-recommends libopencv-dev gcc g++ git cmake make wget unzip
    wget https://download.pytorch.org/libtorch/cpu/libtorch-cxx11-abi-shared-with-deps-2.5.1%2Bcpu.zip
    unzip 'libtorch-cxx11-abi-shared-with-deps-2.5.1+cpu.zip'
    rm 'libtorch-cxx11-abi-shared-with-deps-2.5.1+cpu.zip'
    git clone --depth 1 https://github.com/pierotofy/OpenSplat
    mkdir OpenSplat/build
    cd OpenSplat/build
    cmake -DCMAKE_PREFIX_PATH=../libtorch/ .. && make -j1
It seems that OpenSplat requires 'sparse' files first. What are those? Apparently they are made by colmap - a tool used in photogrammetry and 'obvious' to anyone in photogrammetry (thus nobody felt the need to explain what 'sparse' files are or that they were required). But by 'sparse' they mean: point cloud representing the locations of each photograph.
Ubuntu provides the binary too; it and its dependencies require only 22MB:
apt install --no-install-recommends colmap
My old laptop has proven surprisingly adept at making gaussian splats - 15 minutes to make a relatively decent splat is astonishing for such an old machine without a GPU!
But I have other things to do on my laptop, so I have to offload this task onto other peoples' computers.
Hetzner has far lower prices than AWS - in fact at $30/month for 8 CPU cores it might even be cheaper than building and running your own equivalent machine.
The downside is that it doesn't provide the tools that AWS does - it is basically a barebones Ubuntu server.
They do offer a way to automate server setup, but - as you can see below - it is a non-standard YAML configuration with little documentation, and I didn't have time or reason to learn it.
Remember that Bash reads lines one-by-one, so you can continuously alter `queue.txt`, making it easy to make a job queue (called by `(nohup bash queue.sh)&`):
    #!/usr/bin/env bash
    while read -r modelpath n_iters save_every; do
      echo "Waiting for previous job to finish..."
      # NOTE: Can't use `wait` because it requires PID to be child of the shell... wait "$(pidof opensplat)"
      previous_previous_pid=""
      while [[ true ]]; do
        previous_pid="$(pidof opensplat)"
        if [[ "$previous_pid" ]]; then
          previous_previous_pid="$previous_pid"
          echo "OpenSplat process (pid=$previous_pid - first is always empty fake PID even if proc doesn't exist) exists - waiting 5 mins"
          sleep 300
        else
          for f in splat*.ply; do
            mv "$f" "$previous_previous_pid.$f"
          done
          break
        fi
      done
      echo "Starting new job: $modelpath -- $n_iters -- $save_every"
      OpenSplat/build/opensplat "$modelpath" -n "$n_iters" --save-every "$save_every"
    done < queue.txt
To create the `sparse/` folder (well, basically it estimates camera positions and creates a database of points of camera and 3D objects):
colmap automatic_reconstructor --image_path /path/to/project/imagedir --workspace_path /path/to/project --sparse true --dense false --data_type individual --use_gpu false --num_threads 2 --quality high [for some projects maybe: extreme] [for some projects: --single_camera or --single_camera_per_folder]
To train the splat:
opensplat /path/to/project -n 2000 --save-every 1000
Considering how extremely memory-intensive these programs are, there is a risk of crashing your computer due to OOM errors. You can avoid this by limiting memory per process, which can be managed by `systemd` policies or per-invocation (`systemd-run --scope -p MemoryMax=5G --user [commands]`).
To downsize my smartphone's JPEGs and convert to PNGs - in one pass to avoid data loss - I use `imagemagick`:
cp -r images_orig images && find images -type f -exec mogrify-im6.q16 -resize 639x852 -format png {} \; && find images -type f -name '*.jpg' -delete && while read -r fp; do mv "$fp" "${fp:0:-4}.jpg"; done < <(find images -type f -name '*.png')
The problem is EXIF rotation. Some programs apply EXIF rotations, some don't. Looking at the output of some of my `opensplat` experiments, either `opensplat` or `colmap` appears not to apply EXIF rotations to image data. And that makes sense for `colmap` - `colmap` has no need for the input images to be the right way up, because its whole purpose is to guess camera locations independent of orientation.
Thus you need to convert the `JPEG`s to `PNG`s without applying EXIF rotations.
It would be simpler to use `convert` instead of `mogrify`, just because `mogrify` doesn't allow you to specify the output file path - except unfortunately `convert` doesn't allow you to not apply EXIF rotation. It's strange that `imagemagick` has two binaries that do these overlapping things.
CANT USE BECAUSE IT AUTO-ROTATES THEM: cp -r images_orig images && find images -type f -exec convert-im6.q16 -resize 639x852 -format png {} {} \;
You can use high-resolution `JPEG`s for `colmap`, then convert to downsized `PNG`s for `opensplat` (which you might sometimes have to do, due to `opensplat` being more memory-intensive) - you must merely ensure the `PNG`s end with `.jpg`, the image loader only cares that the paths are the same, it doesn't care which format the image is.
The `ply` files are not very compressible - `zstandard` reduces file size by only at most 10MB, regardless of whether the `ply` file is 20MB or 60MB. It also seems that the larger the iteration, the less the file size reduction - perhaps because higher iterations leads to more non-zero bits in the floating points and thus less redundancy for the compressor to exploit.
Every dataset I've found thus far are small (~300KB) JPEGs of resolution around 480x720. But I assume that for my case, I need finer resolution to capture smaller details (e.g. hairs and pores).
The problem is that this might (a) cause the training to take forever, and (b) cause worse results due to the model being optimised/assuming smaller resolutions.
I can't find out whether or not cropping is okay. Colmap's output - and common sense - implies that colmap tries to guess the camera settings somewhat, which implies that cropping (which would make the images uneven) might violate those assumptions.
There's obviously no reason to use JPEG for this kind of thing - because GPUs don't recognise JPEG formats and thus the compression does not save VRAM. So it's surprising that almost all datasets and discourse that I've seen is about JPEG input.
Colmap might or might not support 8-bit PNGs, but probably does not support RAW inputs.
I can't find any information about that in OpenSplat - but the project uses OpenCV, which I've used before and know supports PNG.
Annoyingly, `gwenview` does not display the embedded JPEG previews that are inside most RAW files, so instead, I have to extract them (`exiftool -b -previewImage -w .jpg ...PEF`), delete the JPEGs that are obviously useless, then delete the RAW files that don't have existing JPEGs.
Also: `darktable`'s 'lighttable' shows the 'backed-in' JPEGs from RAW files, instead of previews of the 'darkroom' outputs - so exporting with consistent lighting is a pain. It was stupid of me to keep the shutter speed on `auto` instead of a fixed value.
Send me feedback about this section

For 38 images of my 'Dystopian Wars' model, it took `colmap`:
But then `mapper` failed:
W20250107 14:56:59.365226 409731 incremental_mapper.cc:349] No images with matches found in the database
So I tried the GUI way (`./colmap gui`) - it allows you to easily twiddle the parameters. Not that I understand what any of the parameters do. One option was to do 'automatic reconstruction' - so I figured I'd give that a go. It implies a 'mask folder' is required, but obviously I didn't have one, so I kept it blank (I believe it is for ignoring backgrounds). The only option I changed was to disable GPU and set maximum threads to 1 (because multithreaded software, if designed exclusively for powerful machines, crashes my weakling computer). This time, it took:
Ooh. I should have set `Quality` to `Low`. And I should have specified `Shared intrinsics` (i.e. same camera). And in hindsight, I should have scaled down the images (I forget my phone takes 4K images - actually larger than colmap's maximum internal resolution of 3200px).
Well, at least it worked this time. Although the point cloud seems to only have produced images from 14 images in a 90 degree source of camera locations, so the other 24 images seem to have been ignored or not able to map, which might have been caused by my reflection (from leaning over the model) confusing things. But probably because I didn't take enough photographs (thus they had insufficient overlap).
OpenSplat trains gaussian splats as though they are ML models, and it periodically adds and removes points to try to get closer to the source images:
    $ ./opensplat /path/to/workspace -n 2000 --save-every 1000
    Reading 6148 points
    [Loading images]
    Step 1: 0.280272
    [...]
    Step 300: 0.126468
    [...]
    Step 600: 0.134222
    Added 4526 gaussians, new count 10674
    Culled 2110 gaussians, remaining 8564
    Step 601: 0.213247
    [...]
    Step 700: 0.160573
    Added 7220 gaussians, new count 15784
    Culled 1673 gaussians, remaining 14111
    Step 701: 0.200745
    [...]
    Step 733: 0.110043
    [...]
    Step 800: 0.130256
    Added 8434 gaussians, new count 22545
    Culled 2939 gaussians, remaining 19606
    Step 801: 0.184157
    [...]
    Step 900: 0.111187
    Added 9290 gaussians, new count 28896
    Culled 3495 gaussians, remaining 25401
    Step 901: 0.191944
    [...]
    Step 976: 0.0922723
    [...]
    Step 999: 0.131749
    Step 1000: 0.150709
    [...]
    Step 1057: 0.0846104
    [...]
    Step 1400: 0.0790372
It does around 14 steps per minute.
Blender can't import gaussian splats natively (although it can import them as plain point clouds) - one must use an addon and import through that.
Weirdly, I can import my splat fine, but all the other splat files that I've downloaded (e.g. from sketchfab and splatgallery) won't import. I edited (and thus exported) my splat file with SuperSplat first - but doing the same with the 3rd-party files didn't fix them.
I get a similar error - 'x not found' - in my JavaScript splat renderer when importing some of these files. 'x' is the same key that the Blender addon complains is missing.
It must be because these files are made by normies who do it through paid apps instead of through the Colmap->OpenSplat pipeline. Another clue that this is the case is how the files have roughly the same magnitude of points (0.5 to 2 million) regardless of whether it is a simple knife or a drone or a whole mountain landscape - that implies to me that they used basically the same settings for each.
Oh well. It just means I can only rely on my own assets.
This time, I took 51 portrait photos of my face outside.
40 had the same lighting when exported from `darktable`, but I discarded 11 for having a second type of lighting preset or something.
I scaled all images to 1440px height. Everything was much faster this time, despite having more than twice the number of usable photos.
All 40 of these images were successfully used by `colmap`, creating a point cloud of my face and chest. Surprisingly many points were located on my t-shirt.
Each `opensplat` iteration took merely 2 seconds - 7 times as fast as the first time. It also seemed to converge in fewer iterations than before:
    Step 406: 0.165436
    Step 407: 0.0792811
    Step 408: 0.105357
Interestingly, the first time it altered the point cloud, it culled more than inserted:
    Step 600: 0.128476
    Added 5225 gaussians, new count 18979
    Culled 9026 gaussians, remaining 9953
    Step 601: 0.138021
but that probably doesn't mean much:
    Step 700: 0.0999064
    Added 7997 gaussians, new count 17950
    Culled 3916 gaussians, remaining 14034
    Step 701: 0.163424
`colmap` took hours to feature match, then claimed to have written a `sparse` folder, but didn't. There was no error message; the only clue is that it finished after only completing 4 out of the 9 steps it claimed to be undertaking - `Matching block [2/3, 1/3]`. No GPU; 3 threads; no interruption; no 'shared intrinsics' (because I had changed the camera's focal length numerous times).
Actually, it might be because my 'image folder' contained non-image files. The logs indicated that it simply ignored these files without causing errors, but an unexpected error might, possibly have been caused by one of these non-image files changing size during this phase.
Only by running it again, in the CLI instead, gave an answer: it was 'killed', which usually means the OS ran out of memory (OOM error). Indeed, `journalctl -xe` confirmed this.
54 input images, ?x1440px, of my face and (accidentally) woolen jumper.
In `darktable` I kept the default settings, except for disabling the last 2 changes it automatically applied (I think exposure and white balance, or exposure and temperature).
It took slightly over 9 minutes for feature mapping to complete.
Here's part of the output from `colmap`, after feature mapping, which I don't understand; there were a whole bunch of these:
    Completed observations: 20
    Merged observations: 0
    Filtered observations: 1
    Changed observations: 0.000540

    == Global bundle adjustment ==
    iter      cost      cost_change  |gradient|   |step|    tr_ratio  tr_radius  ls_iter  iter_time  total_time
      0  2.343251e+04    0.00e+00    3.91e+03   0.00e+00   0.00e+00  1.00e+04        0    3.76e-02    1.37e-01
      1  2.339659e+04    3.59e+01    2.12e+01   0.00e+00   1.00e+00  3.00e+04        1    8.90e-02    2.26e-01
      2  2.339634e+04    2.56e-01    1.17e+02   9.54e-01   1.06e+00  9.00e+04        1    8.45e-02    3.11e-01
      3  2.339616e+04    1.73e-01    5.02e+02   1.79e+00   9.86e-01  2.70e+05        1    8.34e-02    3.94e-01
      4  2.339598e+04    1.86e-01    1.45e+03   3.18e+00   8.69e-01  4.52e+05        1    8.35e-02    4.78e-01
      5  2.339587e+04    1.09e-01    9.24e+02   2.63e+00   8.98e-01  9.15e+05        1    8.37e-02    5.62e-01
      6  2.339583e+04    3.42e-02    3.85e+02   1.72e+00   9.28e-01  2.46e+06        1    8.38e-02    6.45e-01
      7  2.339583e+04    4.32e-03    5.36e+01   6.43e-01   9.80e-01  7.38e+06        1    8.33e-02    7.29e-01
      8  2.339583e+04    1.03e-04    1.74e+00   7.41e-02   1.07e+00  2.21e+07        1    8.33e-02    8.12e-01
      9  2.339583e+04    1.69e-06    4.95e-01   6.75e-03   1.16e+00  6.64e+07        1    8.35e-02    8.95e-01
      10  2.339583e+04   5.19e-08    8.90e-02   1.02e-03   1.18e+00  1.99e+08        1    8.36e-02    9.79e-01

    == Bundle adjustment report ==
       Residuals : 77872
      Parameters : 23137
      Iterations : 11
            Time : 0.981852 [s]
    Initial cost : 0.548553 [px]
      Final cost : 0.548124 [px]
     Termination : Convergence
The number of parameters seemed to be monotonically increasing; everything else looked basically 'random'.
`opensplat` converged faster than ever before - reaching `0.0388234` by step 321.
The result looks like my face has 2 or 3 positions - and indeed I do remember moving it slightly at one or two points while taking the photos.
My next attempt at a face (which converged even faster - `0.0396652` by step 76 - but struggled to go below `0.013`) only had one 'block' in the feature matching phase. Do the 'blocks' refer to things which `colmap` can't map onto each other - like two objects that are not connected - and does one object moving in between frames look like a different 'block' to `colmap`? That would explain it.
This was my 5th project.

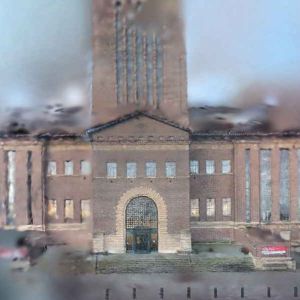
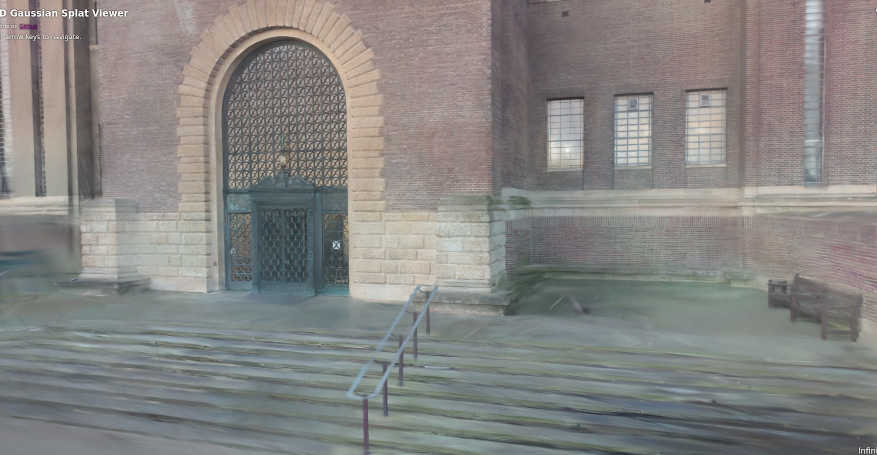
I took just 83 photos of King's College, at the crack of dawn.
It took little more than 90 minutes to create - and it was quite complex! It had two 'blocks' but came out fine.
The output was surprisingly great, even with merely 80,000 gaussians. It even captured the bikes parked in front, and had some slight detail inside the porters' office window.
This surprised me because this was before I knew to fix the 'f' value (aperture scale?) on my camera.
It is surprising how well gaussian splats compress the data - 2.2 megabytes to display this level of 3D+colour detail is probably similar to what an extremely well-optimised hand-crafted model would take (most of the data size would be image data). It's barely larger than a single one of the PNG images that it was trained on.
2.4GB of `RAW` images -> 161MB of `PNG` images -> 155MB of `colmap` 3D point data -> 22MB `ply` file -> 2.8MB `splat` file


I spent 20 minutes walking to it, and 40 minutes taking photos, in -5C weather. My hands were so cold by the end of it that, when I put them in my coat pockets, it was the 3rd most painful experience of my life - it felt like my fingertips were going to explode. Even now, hours later, my fingertips feel tender, like they would if they had been briefly scalded by boiling water.
The fingertips probably have the most nerve endings of any part of the body, and they were all screaming out in pain when warm blood began getting pumped to them again. It was 10 minutes before my left hand stopped hurting, and 5 more minutes before my right hand too.
It wasn't the cold air temperature that was the killer - it was holding the metal-and-plastic camera for 40 minutes, which was as cold as a fridge.
On the way back, I had a strand of ice on my eyelashes. Hours later, my camera is still very cold to the touch.
I hadn't realised it was quite that cold - I assumed it would be about 0C.
268 photos: 9GB of RAW files, or 716MB of PNG files (using dimension slightly larger than 1500x1000). 4 images were excluded by `colmap`'s feature_extractor, for unknown reason.
`colmap`'s feature_extractor took 14 minutes to complete - 10 times longer than the King's model, which (by a very primitive but traditionally accurate estimation) suggests it might take 15 hours to complete the `feature_matching`.
The first of the 36 `feature_matching` steps took 35 minutes. I would have expected each subsequent step to be faster, because each subsequent step has fewer unmatched vertices to check, but that seems false - only the very last step of each 'block' is fast:
    Block 1: 2082.488s 1889.875s 2903.604s 3407.569s 2653.440s 83.971s
    Block 2: 3081.145s 3341.300s 4294.143s 4916.580s 4968.686s 214.382s
    Block 3: 3186.875s 3393.175s 4101.272s 4752.475s 3750.786s 70.222s
    Block 4: 3678.503s 4234.905s 4821.515s 5228.732s 4346.318s 246.880s
    Block 5: 3840.820s 4832.623s 5361.691s 5973.776s 5042.449s 262.435s
    Block 6: 798.514s  1200.966s 1279.106s 1979.995s 2006.684s [around 260s]
    Pattern:           up        up        up        down      down
Afterwards, I got some occasional `No convergence` results, although most others did converge:
    Registering image #134 (122)
    Image sees 7755 / 8842 points

    == Pose refinement report ==
       Residuals : 30070
      Parameters : 8
      Iterations : 8
            Time : 0.224867 [s]
    Initial cost : 0.808028 [px]
      Final cost : 0.72115 [px]
     Termination : Convergence
    Continued observations: 7282
    Added observations:     1629

    == Bundle adjustment report ==
       Residuals : 156080
      Parameters : 10055
      Iterations : 31
            Time : 3.28876 [s]
    Initial cost : 0.623608 [px]
      Final cost : 0.61152 [px]
     Termination : No convergence
    Merged observations:    1459
    Completed observations: 612
    Filtered observations:  1973
    Changed observations: 0.051820

    == Bundle adjustment report ==
       Residuals : 150008
      Parameters : 9059
      Iterations : 3
            Time : 0.368717 [s]
    Initial cost : 0.720161 [px]
      Final cost : 0.714754 [px]
     Termination : Convergence
What does it all mean? No clue, but it's fun to speculate:
And why this?:
    Registering image #193 (187)
    ...
    Registering image #191 (188)
    ...
    Registering image #190 (189)
    ...
    Registering image #152 (190)
Why does each image have two indices? Does this step sort them by some different value?
And then, on image 240 out of 268, this error occurred for almost every iteration between iteration 30 and 75, resulting in `No convergence`:
levenberg_marquardt_strategy.cc:123] Linear solver failure. Failed to compute a step: CHOLMOD warning: Matrix not positive definite.
Those errors didn't look fatal.
The final 'bundle adjustment report':
Residuals : 4597474
Parameters : 616172
Iterations : 5
Time : 179.266 [s]
    Initial cost : 0.70811 [px]
      Final cost : 0.707993 [px]
     Termination : Convergence
The final `colmap` result was almost 205,000 points. The SQLite database's final size was 795MiB; in addition `sparse/` was 95MiB.
`colmap` uses surprisingly little memory - less than 5GB most of the time, although sometimes it crashes with OOM with certain small input datasets. But I've heard of people using tens of thousands of images with 32GB of memory.
Each gaussian splat uses ~2000 bytes, so it should easily be able to render even on my old laptop.


Interestingly, the less-trained model worked better for distant views of the scene, while the more-trained model worked better for closeups but worse for those distant views.

At first, I stood upright and took photos of my face with my arm outstretched. This turned out surprisingly well - although nowhere near usable - even when I used the big heavy camera! The face models looked like there were two faces depending on which position you looked - presumably because my face slightly moved in between photos.
Then I learned about 'interval shooting' on cameras, and set up my DSLR to shoot at 2 second intervals, putting myself in a rotating chair for 33 photos. I then put a mask filter on each photo input to `colmap`, to force `colmap` to believe the camera was moving (instead of me moving). `colmap` took merely 0.3 seconds to complete - presumably because the image files were so small and the masks vastly reduced the usable pixels and features! Even though `OpenSplat` does not yet have a mask feature, it worked surprisingly well, producing a single coherent face. It has the side-effect of giving me a halo, from `OpenSplat` trying to fit the static background elements in (when I am falsely telling it that the camera and thus background is not static).
I thought about:
But after everything is said and done, buying an RC car and mounting a camera on it seems no more expensive than any other option, with more advantages. Isn't it absurd that an RC car is chaper than an office chair? The cost must be primarily logistics (i.e. because the chair is bulkier and heavier) - because our logistics chains, even for such basic items, are so far away (i.e. in China).
But then I thought about it more. Attaching a DSLR camera to an RC car seems difficult to work with if I need to stay still - because I'd need to fiddle with the controls for ages between each frame, to keep it focused on me.
So: drone photography it is. The cheapest DJI drone - Mini 4K - is apparently completely fine. Apparently it's pretty easy to sell town reels too, if I can be bothered to do that. And I could get some really cool night shots - I'd need to check if the gimbal can keep in place for a full second, but if so, just imagine the possibilities.
My first drone photography selfie was a success - I stayed surprisingly still while the drone circled me. The problem was that my tiny movements are still enough to make my face look blurry. If I use masks to force `colmap` to centre my head regardless of its movements, then the landscape around me is not captured. I thus have to run the pipeline twice - once where my head is centred, and once where the static landscape around me is centred - and merge the landscape's splat into my head's splat, so that it can continue training. These two splats would have slightly different calculated camera positions, so I must read the camera metadata files and calculate a way to transform one into the other, and apply that transformation to the gaussians in the landscape splat.


While leaving the scene, I jumped over the ditch, as I usually do. My foot caught a clump of grass - normally not a problem, but this time it was frozen solid, so it tripped me up, and I bashed my knee and hands into the rock-hard frozen soil. Luckily my camera was okay. I had a streak of blood on my right hand but I couldn't see any scratches there - strange. But it was all fine after a few minutes, although I wouldn't run on this knee yet.
Send me feedback about this section
There are some datasets you can use to train your own 3D models.
Using the lecture hall example published by some Swiss/Google people from ETH, I was able to create the worst results I've ever made:

It's the same workflow that I use with my own datasets, but it's worse than any other results I've got.
It actually got worse after 3k iterations too:


I suspect it is because this takes a 360 degree view of the room, for which 23 photos is not enough. For almost all the datasets I've created myself, I take at least 20 photos for a 90 degree span of an object.
Send me feedback about this section
Send me feedback about this section
I briefly looked at photographers to help take photo datasets.
The first thing I noticed was how absurdly over-priced photographers are. I could rent a drone and drone operator for a whole day for half the price of a 10-image photoshoot and 4 minute video. A slightly cheaper option is £295 for 2 photos. What exactly is it that allows photographers to charge so much money? It's not difficult to learn how to take good photos - studio lighting is the only real advantage they have. Perhaps the type of people who want to pay for good photos are the type of people who are willing to pay huge sums to get the very best photos (e.g. wedding photos - if the wedding costs £40,000, who cares if the photography cost £2000?).
So I thought, maybe I could rent 30 cameras and use an arduino or something to take simultaneous photos. No! It costs £100 to rent a single camera for a day.
This site hosts their sample videos on Vimeo, which won't let me play the videos because I'm not logged in. Their email link had an erroneous space in it. Why not just host the video yourself??? It's actually easier to upload a file to your web server than to Youtube!
Around 10% of company websites had expired HTTPS certificates - all of which had expired the previous day.
This site charges £20 for a single 360-degree image, or £135 for a 360-degree tour of a business. I could easily shoot such a scene in 30 minutes, and process using less than £10 of computing power, to create a proper 3D scene.
This site - a photography studio way above my pay grade, which works with huge film productions such as Dune and Indiana Jones - mentions that they do radiance field capture too. That's the only photography service I've seen mention it (although a similar service mentions 'volumetric capture'). But despite how exclusive they are, pages on the website direct visitors to a page that doesn't exist - they moved the `/services/` page to the home page `/` without setting up an HTTP redirect.